Google I/O 2016

IT/Android 2016. 5. 18. 11:42


미국 시간 2016년 5월 18일 10시에 구글에서 매년 개최하는 Google I/0 2016이 개최된다.

자세한 일정은 아래 사이트를 참고하면 됩니다.

https://events.google.com/io2016/


5월 18일 10시 키노트 발표를 시작으로 다양한 분야에 걸쳐서 세션 발표가 진행된다.

올해 발표될 아이템에 대한 예측 기사는 아래의 링크를 참고하시기 바랍니다.

http://www.ciokorea.com/column/29646

1. 증강 현실, 가상 현실 및 360도 비디오

2. 더 많은 개발자를 위한 인공 지능과 머신러닝

3. 파이어베이스 개발 가속화와 가격 인하

4. 파이어베이스의 사물 인터넷 확장

5. 안드로이드 N 

6. 크롬 OS의 통합과 확장

7. 프로젝트 오라

8. 프로그레시브 웹 앱 개발용 오픈소스 프레임워크

9. 개선된 온허브

반응형
블로그 이미지

조이풀 라이프

Lift is short, enjoy the life

,

라즈베리파이를 이용한 아마존 에코 서비스를 만들기 위한 오프소스 프로젝트가 진행되고 있다.

아래의 링크를 방문하면 자세한 소스 코드 및 설명이 소개되어 있다.

https://github.com/amzn/alexa-avs-raspberry-pi


Project: Raspberry Pi + Alexa Voice Service

About the Project

This project demonstrates how to access and test the Alexa Voice Service using a Java client (running on a Raspberry Pi), and a Node.js server. You will be using the Node.js server to get a Login with Amazon authorization code by visiting a website using your computer's (Raspberry Pi in this case) web browser.

This guide provides step-by-step instructions for obtaining the sample code, the dependencies, and the hardware you need to get the reference implementation running on your Pi. For Windows, Mac, or generic linux instructions, see this guide.


Getting Started

Hardware you need

  1. Raspberry Pi 2 (Model B) - Buy at Amazon. UPDATE: Even though this guide was built using a Raspberry Pi 2, it should work just fine with a Raspberry Pi 3 as well. Pi 1 users - please see this thread for help.
  2. Micro-USB power cable for Raspberry Pi (included with Raspberry Pi)
  3. Micro SD Card - To get started with Raspberry Pi you need an operating system. NOOBS (New Out Of the Box Software) is an easy-to-use operating system install manager for the Raspberry Pi. The simplest way to get NOOBS is to buy an SD card with NOOBS preinstalled - Raspberry Pi 8GB Preloaded (NOOBS) Micro SD Card
  4. An Ethernet cable
  5. USB 2.0 Mini Microphone - Raspberry Pi does not have a built-in microphone; to interact with Alexa you'll need an external one to plug in - Buy at Amazon
  6. External Speaker with 3.5mm audio socket/stereo headset jack - Buy at Amazon
  7. A USB Keyboard & Mouse, and an external HDMI Monitor - we also recommend having a USB keyboard and mouse as well as an HDMI monitor handy if for some reason you can’t “SSH” into your Raspberry Pi. More on “SSH” later.
  8. WiFi Wireless Adapter (Optional) Buy at Amazon

Skills you need

  1. Basic programming experience
  2. Familiarity with shell


반응형

'IT > IoT' 카테고리의 다른 글

라즈베리파이 OS설치부터 기본 설정하기  (0) 2016.05.11
블로그 이미지

조이풀 라이프

Lift is short, enjoy the life

,


[라즈베리파이 상세 설명]

아래의 라즈베리파이 공식 홈페이지를 참조하시기 바랍니다.

https://www.raspberrypi.org/

http://www.leocom.kr/RaspberryPi/Default.aspx


[OS 인스톨하기]

아래 경로의 링크로 가셔서 원하시는 OS 선택해서 설치하면 됩니다.

https://www.raspberrypi.org/downloads/

Raspbian is the Foundation’s official supported Operating System. Download it here, or use NOOBS, our easy installer for Raspbian and more.


다운로드 받은 ZIP 파일의 압축을 풀면, img 파일이 나온다. 라즈베리파이에 사용할 SD 카드를 PC에 넣고 이 이미지 파일을 SD 카드에 굽는다. 윈도우에서는 Win32 Disk Imager를 이용해서 이미지 파일을 구울 수 있다. Win 32 Disk Imager는 https://sourceforge.net/projects/win32diskimager/ 에서 다운로드 받아 설치하면 된다.


[Win32 Disk Imager를 이용한 이미지 굽기]


[기본 설정]


1. 디스크 용량 확장하기

Mico Flash Disk의 용량 모두 사용하기 위해서 디스크 용량 확장하기가 필요합니다.


SD카드 전부 활용하도록 해줍시다.

터미널에서 raspi-config 

- expand_rootfs

- 재부팅


2. 비밀번호 설정

리눅스를 깐 후에 비밀번호 설정은 기본!

sudo passwd 쳐서 현재 계정(기본계정 pi) 의 비밀번호를 설정합니다.

기존 비밀번호는 raspberry

sudo passwd root를 쳐서 root계정의 비밀번호를 설정합니다


3. 인터넷 잡아주기

 
cd /etc/network 경로에서 sudo nano interfaces 를 치면 interfaces 문서가 열리는데

여기보면 iface eth0 inet manual이라고 되어있을 겁니다.

manual을 dhcp로 바꿔주세요.


무선랜은 iface wlan0 inet manual에서 manual을 dhcp로 바꾸고

그 아래에wpa-roam 이거 주석처리하고 (#이 주석) 

wpa-ssid "와이파이 SSID

wpa-psk "비번"


4. 업데이트 

(인터넷 연결 필수)

sudo apt-get update

sudo apt-get upgrade


5. 한글 입력기 설치


sudo apt-get install ibus ibus-hangul


반응형

'IT > IoT' 카테고리의 다른 글

라즈베리파이를 이용한 아마존 에코 서비스 만들기  (0) 2016.05.11
블로그 이미지

조이풀 라이프

Lift is short, enjoy the life

,

머신러닝 입문을 위한 좋은 강의 소개


이번에 소개드릴 강의는 홍콩 과기대에 교수로 계시는 김성훈 교수님의 유튜브 강의 및 Lecture Note를 소개합니다.


[유튜브 강의]

https://www.youtube.com/playlist?list=PLlMkM4tgfjnLSOjrEJN31gZATbcj_MpUm


유튜브 강의에 대한 자세한 자료는 아래의 Github에 소개되어 있습니다.


[Github 강의 소개]

http://hunkim.github.io/ml/ 

모두를 위한 머신러닝과 딥러닝의 강의

알파고와 이세돌의 경기를 보면서 이제 머신 러닝이 인간이 잘 한다고 여겨진 직관과 의사 결정능력에서도 충분한 데이타가 있으면 어느정도 또는 우리보다 더 잘할수도 있다는 생각을 많이 하게 되었습니다. Andrew Ng 교수님이 말씀하신것 처럼 이런 시대에 머신 러닝을 잘 이해하고 잘 다룰수 있다면 그야말로 "Super Power"를 가지게 되는 것이 아닌가 생각합니다.

더 많은 분들이 머신 러닝과 딥러닝에 대해 더 이해하고 본인들의 문제를 이 멋진 도구를 이용해서 풀수 있게 하기위해 비디오 강의를 준비하였습니다. 더 나아가 이론에만 그치지 않고 최근 구글이 공개한 머신러닝을 위한 오픈소스인 TensorFlow를 이용해서 이론을 구현해 볼수 있도록 하였습니다.

수학이나 컴퓨터 공학적인 지식이 없이도 쉽게 볼수 있도록 만들려고 노력하였습니다.

시즌 2 - 계획중입니다.

  • Word2Vec, NLP, QA, TF Serving, 분산환경등을 계획중이며 주제에 대한 많은 요청이 있으면 진행합니다. 요청 이메일: hunkim+ml@gmail.com
  • 시즌 1 - 딥러닝의 기본 (곧 종료)

    Acknowledgement

    이 비디오는 저도 인터넷등을 통해 공부하면서 만든것이며 아래 자료를 많이 사용하였습니다.


    반응형

    'IT > 머신러닝' 카테고리의 다른 글

    Windows 10에 Tensor Flow 설치하여 머신러닝 사용하기  (0) 2016.12.05
    AWS에 Tensorflow 설치하기  (0) 2016.05.10
    블로그 이미지

    조이풀 라이프

    Lift is short, enjoy the life

    ,

    구글 애드센스 입금 계좌 연결하기


    1. 외환계좌 만들기

    신한은행: 외화 체인지업 예금

    기업은행: 기은외화종합통장

    외화통장은 달러만 입출금시 수수료가 무료

    입출금 수수료는 각지점 은행에서 할임/감면 받을 수 있음

    달러외 외화는 집에 보관하는게 이득, 수수료 많음


    2. 계좌를 만들었으니 애드센스에 계좌 연결


    애드센스 지급설정에서 [새 결제 수단 추가]를 눌러주세요, 아래와 같은 화면이 뜨면 여기에 계좌정보를 입력해 주시면 됩니다. 예금주는 영문으로 입력하시고, 은행이름과 SWIFT 은행 식별코드는 아래 화면을 참고해서 정확하게 입력하시면 됩니다.

    다 입력하고 저장하면 됩니다.


    은행명 (영문)

    스위프트 코드 (SWIFT Code) (B.I.C.) 

     국민은행 (KOOKMIN BANK)                 

    CZNBKRSE

     기업은행 (Industrial Bank of Korea) 

    IBKOKRSE

     신한은행 (SHINHAN BANK) 

    SHBKKRSE

     하나은행 (HANA BANK)

    HNBNKRSE

     농협 (National Agricultural Cooperative Federation)

    NACFKRSE

     SC제일은행 (STANDARD CHARTERED FIRST BANK KOREA) 

    SCBLKRSE

     우체국 (KOREA POST OFFICE)

    SHBKKRSEKPO

     외환은행 (KOREA EXCHANGE BANK)

    KOEXKRSE

     우리은행 (WOORI BANK)

    HVBKKRSE

     수협 (KOREA EXCHANGE BANK)

    NFFCKRSE

     광주은행 (THE KWANGJU BANK.LTD.)

    KWABKRSE

     경남은행 (KYONGANM BANK)

    KYNAKR22ITL

     대구은행 (DAEGU BANK)

    DAEBKR22SEL

     부산은행 (BUSAN BANK)

    PUSBKR2PINT

     전북은행 (JEONBUK BANK)

    JEONKRSE

     수출입은행 (The Export-Import Bank of Korea)

    EXIKKRSE

     씨티은행 (CITYBANK Korea)

    CITIKRSX


    반응형

    '기타' 카테고리의 다른 글

    구글 애드센스 사용  (0) 2016.05.09
    블로그 이미지

    조이풀 라이프

    Lift is short, enjoy the life

    ,


    대관령 양떼목장 가족 여행기 


    반응형

    '즐거움' 카테고리의 다른 글

    콜라 빨리 마시기  (0) 2016.05.10
    블로그 이미지

    조이풀 라이프

    Lift is short, enjoy the life

    ,

    콜라 빨리 마시기

    즐거움 2016. 5. 10. 12:54


    금년도 체육대회 행사 중 콜라 빨리 마시기 대회의 즐거운 광경


    반응형

    '즐거움' 카테고리의 다른 글

    대관령 양떼목장 가족 여행기  (0) 2016.05.10
    블로그 이미지

    조이풀 라이프

    Lift is short, enjoy the life

    ,

    Functional Programming Principles in Scala

    함수 언어의 한 종류인 스칼라에 대해서 소개해 드립니다.

    자세한 스칼라 언어소개는 아래의 위키를 참조하시기 바랍니다.

    https://ko.wikipedia.org/wiki/%EC%8A%A4%EC%B9%BC%EB%9D%BC_(%ED%94%84%EB%A1%9C%EA%B7%B8%EB%9E%98%EB%B0%8D_%EC%96%B8%EC%96%B4)


    아래 링크는 스칼라 언어 창시자인 마틴 오더스키(Martin Odersky) 교수님께서 강의를 진행한 교세라 링크입니다.

    https://www.coursera.org/course/progfun

    교세라 강의는 스칼라 개발 환경 셋팅부터 7주에 걸쳐 스칼라 강의를 진행하며 Lecture Note, Video 강의를 제공합니다.

    Tools Setup


    In order to work on the programming assignments, you need to have the following tools installed on your machine:

    • JDK, the Java Development Kit, version 1.7 or 1.8
    • Sbt, a build tool for Scala, version 0.13.x
    • The Scala IDE for Eclipse (or another IDE of your choice)

    Please follow the instructions on this page carefully.

    Installing the JDK

    Linux

    • Ubuntu, Debian: To install the JDK using apt-get, execute the following command in a terminal sudo apt-get install openjdk-7-jdk
    • Fedora, Oracle, Red Had: To install the JDK using yum, execute the following command in a terminal su -c "yum install java-1.7.0-openjdk-devel"
    • Manual Installation: To install the JDK manually on a Linux system, follow these steps:
      1. Download the .tar.gz archive from http://www.oracle.com/technetwork/java/javase/downloads/jdk7-downloads-1880260.html
      2. Unpack the downloaded archive to a directory of your choice
      3. Add the bin/ directory of the extracted JDK to the PATH environment variable. Open the file ~/.bashrc in an editor (create it if it doesn't exist) and add the following line export PATH=/PATH/TO/YOUR/jdk1.7.0-VERSION/bin:$PATH

    Verify your setup: Open a new terminal (to apply the changed .bashrc in case you did the manual installation) and type java -version. If you have problems installing the JDK, ask for help on the forums.

    Mac OS X

    Mac OS X either comes with a pre-installed JDK, or installs it automatically.

    To verify your JDK installation, open the Terminal application in /Applications/Utilities/ and type java -version. If the JDK is not yet installed, the system will ask you if you would like to download and install it.

    Windows

    To verify the JDK installation, open the Command Prompt and type java -version. If you have problems installing the JDK, ask for help on the forums.

    Installing sbtDonwload sbt for your platform here. Follow the instructions that page to get it running.

    This course requires sbt version 0.13.x. If you have previously installed sbt 0.12.x, you need to uninstall it and install a newer version. sbt 0.13.x can be used for projects and other courses requiring sbt 0.12.x, but not the other way around. If in doubt, you can check your currently installed sbt like this: in an arbitrary directory that is not a programming assignment or otherwise an sbt project, run:

    $ sbt --version

    You should see something like this:

    sbt launcher version 0.13.0

    If the sbt command is not found, or if you get a non-0.13.x version, you need to install sbt 0.13.x.

    Installing the Scala IDE for Eclipse with the Scala Worksheet (Linux / Mac OS X / Windows)

    You can download the Scala IDE for eclipse with the Scala Worksheet pre-installed from the following URL:

    http://scala-ide.org/download/sdk.html (Make sure to download the IDE for Scala version 2.11.x!)

    After downloading the archive for your operating system, simply unpack it and start eclipse. Eclipse requires you to select a workspace on startup. We recommend you create one workspace directory for this class and use it for all assignments.

    Hello World: Scala IDE and the Scala Worksheet

    To familiarize yourself with the Scala IDE, create a small "Hello World" project in eclipse:

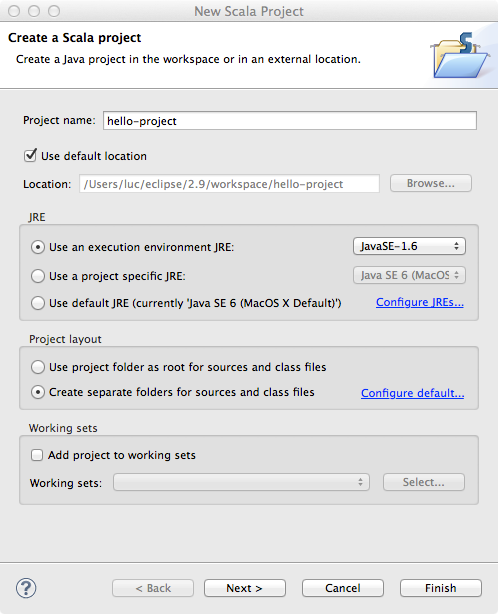
    1. Go to "File" - "New" - "Other..." and select "Scala Project" from the folder "Scala Wizards"
    2. Chose a project name and select "Finish" 
    3. Select "File" - "New" - "Scala Object" to create a new object
    4. Enter Hello as the name for the object and put greeter as the package name above 
    5. Change the source code to the one given below [1]
    6. Save the file and select "Run" - "Run" from the menu. Chose to run as "Scala Application" 

    You should see a the hello world output in the Eclipse console.

    [1] Source code

    package greeter
    object Hello extends App {
      println("Hello, World!")
    }

    Creating a Scala Worksheet

    Creating a Scala Worksheet is very easy:

    1. Right-click on the package greeter in the hello world project that you just created
    2. Select "New" - "Scala Worksheet"
    3. Choose a name for your worksheet (different than Hello or the name you chose for the "Scala Object" before)

    Now you can type some Scala code into the worksheet. Every time you save the file, the content of the worksheet will be evaluated. Copy the following code into the object of your worksheet:

      val x = 1                                       //> x  : Int = 1
      def increase(i: Int) = i + 1                    //> increase: (i: Int)Int
      increase(x)                                     //> res0: Int = 2

    IntelliJ (optional alternative IDE)

    If you want to use the IntelliJ IDE instead of Eclipse, some guidance is provided through the IntelliJ tutorial page and the IntelliJ getting started video.


    Sbt Tutorial

    We use sbt for building, testing, running and submitting assignments. This tutorial explains all sbt commands that you will use during our class. The Tools Setup page explains how to install sbt.

    Starting up sbt

    In order to start sbt, open a terminal ("Command Prompt" in Windows) and navigate to the directory of the assignment you are working on. Typing sbt will open the sbt command prompt.

    shell$ cd /path/to/progfun-project-directory                        # This is the shell of the operating system
    shell$ sbt
    > _                                                                 # This is the sbt shell

    Running the Scala Interpreter

    You can start the Scala interpreter inside sbt using the console task. The interpreter (also called REPL, for "read-eval-print loop") is useful for trying out snippets of Scala code. Note that the interpreter can only be started if there are no compilation errors in your code.

    In order to quit the interpreter and get back to sbt, type ctrl-d.

    > console
    [info] Starting scala interpreter...
    Welcome to Scala version 2.11.5 (Java HotSpot(TM) 64-Bit Server VM, Java 1.7.0_04-ea).
    Type in expressions to have them evaluated.
    Type :help for more information.
    
    scala> println("Oh, hai!")                                          # This is the Scala REPL, type some Scala code
    Oh, hai!
    
    scala> val l = List(1, 2, 3)
    l: List[Int] = List(1, 2, 3)
    
    scala> val squares = l.map(x => x * x)
    squares: List[Int] = List(1, 4, 9)
    
    scala>                                                              # Type [ctrl-d] to exit the Scala REPL
    [success] Total time: 20 s, completed Mar 21, 2013 11:02:31 AM
    >                                                                   # We're back to the sbt shell

    Compiling your Code

    The compile task will compile the source code of the assignment which is located in the directory src/main/scala.

    > compile
    [info] Compiling 4 Scala sources to /Users/aleksandar/example/target/scala-2.11/classes...
    [success] Total time: 1 s, completed Mar 21, 2013 11:04:46 PM
    > 

    If the source code contains errors, the error messages from the compiler will be displayed.

    Testing your Code

    The directory src/test/scala contains unit tests for the project. In order to run these tests in sbt, you can use the test command.

    > test
    [info] ListsSuite:
    [info] - one plus one is two
    [info] - sum of a few numbers *** FAILED ***
    [info]   3 did not equal 2 (ListsSuite.scala:23)
    [info] - max of a few numbers
    [error] Failed: : Total 3, Failed 1, Errors 0, Passed 2, Skipped 0
    [error] Failed tests:
    [error]   example.ListsSuite
    [error] {file:/Users/luc/example/}assignment/test:test: Tests unsuccessful
    [error] Total time: 5 s, completed Aug 10, 2012 10:19:53 PM
    > 

    Running your Code

    If your project has an object with a main method (or an object extending the trait App), then you can run the code in sbt easily by typing run. In case sbt finds multiple main methods, it will ask you which one you'd like to execute.

    > run
    Multiple main classes detected, select one to run:
    
     [1] example.Lists
     [2] example.M2
    
    Enter number: 1
    
    [info] Running example.Lists 
    main method!
    [success] Total time: 33 s, completed Aug 10, 2012 10:25:06 PM
    >

    Submitting your Solution to Coursera

    The sbt task submit allows you to submit your solution for the assignment. It will pack your source code into a .jar file and upload it to the coursera servers. Note that the code can only be submitted if there are no compilation errors.

    The submit tasks takes two arguments: your Coursera e-mail address and the submission password. NOTE: the submission password is not your login password. Instead, it's a special password generated by coursera. It is available on theAssignments page.

    > submit e-mail@university.org suBmISsioNPasSwoRd
    [info] Packaging /Users/luc/example/target/scala-2.11/progfun-example_2.11-1.0.0-sources.jar ...
    [info] Done packaging.
    [info] Compiling 1 Scala source to /Users/luc/example/target/scala-2.11/classes...
    [info] Connecting to coursera. Obtaining challenge...
    [info] Computing challenge response...
    [info] Submitting solution...
    [success] Your code was successfully submitted: Your submission has been accepted and will be graded shortly.
    [success] Total time: 6 s, completed Aug 10, 2012 10:35:53 PM
    >


    Eclipse Tutorial

    We recommend using the Scala IDE for Eclipse to work on the programming assignments for this course. You are of course free to use any text editor or IDE - however we are not able to provide tutorials or support for other tools.

    The Tools Setup page explains how to install the Scala IDE for eclipse.

    Creating the Eclipse project from sbt

    First, you need to create the Eclipse from sbt, using the eclipse command:

    $ sbt
    > eclipse
    ...

    Opening the Project in Eclipse

    Once the Eclipse project has been created from sbt, you can import it in Eclipse. Follow these steps to work on the project using the Scala IDE:

    1. Start up Eclipse
    2. Select "File" - "Import" from the menu
    3. In the folder "General", select the item "Existing Projects into Workspace" and click "Next >"
    4. In the textfield "Select root directory:" select the directory where you unpacked the downloaded handout archive
    5. Click "Finish".

    Working with Eclipse

    To learn how to use the Scala IDE, we recommend you to watch the official tutorial video which is available here: http://scala-ide.org/docs/current-user-doc/gettingstarted/index.html.

    This website also contains a lot more useful information and handy tricks that make working with eclipse more efficient.

    Running Tests inside Eclipse

    You can easily execute the test suites directly inside eclipse. Simply navigate to source file of the test suite in src/test/scala, right-click on it and select "Run As" - "JUnit Test".

    The JUnit window will display the result of each individual test.


    반응형
    블로그 이미지

    조이풀 라이프

    Lift is short, enjoy the life

    ,

    Google ExoPlayer 소개

    IT/Android 2016. 5. 10. 11:25

    [설명 슬라이드]

    https://docs.google.com/presentation/d/1pZmGivrEDeBcHkGhmnWkQm0JFDXYlJa_-RhhBW5XJAY/edit#slide=id.g12d3eb2414_1_2


    [Github 저장소]

    https://github.com/google/ExoPlayer


    ExoPlayer

    ExoPlayer is an application level media player for Android. It provides an alternative to Android’s MediaPlayer API for playing audio and video both locally and over the Internet. ExoPlayer supports features not currently supported by Android’s MediaPlayer API, including DASH and SmoothStreaming adaptive playbacks. Unlike the MediaPlayer API, ExoPlayer is easy to customize and extend, and can be updated through Play Store application updates.

    News

    Read news, hints and tips on the news page.

    Documentation

    Using ExoPlayer

    Via jCenter

    The easiest way to get started using ExoPlayer is by including the following in your project's build.gradle file:

    compile 'com.google.android.exoplayer:exoplayer:rX.X.X'

    where rX.X.X is the your preferred version. For the latest version, see the project's Releases. For more details, see the project on Bintray.

    As source

    ExoPlayer can also be built from source using Gradle. You can include it as a dependent project like so:

    // settings.gradle
    include ':app', ':..:ExoPlayer:library'
    
    // app/build.gradle
    dependencies {
        compile project(':..:ExoPlayer:library')
    }

    As a jar

    If you want to use ExoPlayer as a jar, run:

    ./gradlew jarRelease

    and copy library.jar to the libs folder of your new project.

    Developing ExoPlayer

    Project branches

    • The master branch holds the most recent minor release.
    • Most development work happens on the dev branch.
    • Additional development branches may be established for major features.

    Using Android Studio

    To develop ExoPlayer using Android Studio, simply open the ExoPlayer project in the root directory of the repository.

    ExoPlayer 1.5.0 released

    The 1.5.0 release adds multi-track support to ExoPlayer. For each renderer, it’s now possible to query the number of available tracks and their formats using ExoPlayer’s new getTrackCount(int) and getTrackFormat(int, int) APIs. Track selection can be performed using the new setSelectedTrack(int, int) API, and getSelectedTrack(int) can be used to query the current selection for a given renderer.

    Other notable improvements in 1.5.0 include smoother format adaptation and support for MP3 media segments in HLS, as well as limited support for multi-period manifests in DASH. The release notes can be found below.

    • Multi-track support.
    • DASH: Limited support for multi-period manifests.
    • HLS: Smoother format adaptation.
    • HLS: Support for MP3 media segments.
    • TTML: Support for most embedded TTML styling.
    • WebVTT: Enhanced positioning support.
    • Initial playback tests.
    • Misc bug fixes.
    반응형
    블로그 이미지

    조이풀 라이프

    Lift is short, enjoy the life

    ,

    아마존 AWS 시작하기

    IT/AWS 2016. 5. 10. 11:11

    페이스북에서 AWS를 처음 사용하는 사용자를 위한 좋은 자료를 링크하여 공유합ㄴ디ㅏ.


    [AWS EC2 인스턴스 생성하기]
    http://wildpup.cafe24.com/archives/696

    [AWS EC2에서 IAM Role 사용하기]
    http://wildpup.cafe24.com/archives/673

    [EC2 Security Group]
    http://wildpup.cafe24.com/archives/720

    [AWS RDS와 인스턴스 생성]
    http://wildpup.cafe24.com/archives/734

    [AWS RDS 스냅샷 이용하기]
    http://wildpup.cafe24.com/archives/754

    [AWS RDS의 자동 백업 기능 사용하기]
    http://wildpup.cafe24.com/archives/767

    [AWS RDS의 Read Replica 생성]
    http://wildpup.cafe24.com/archives/775

    [AWS S3의 소개와 간단한 사용]
    http://wildpup.cafe24.com/archives/785

    [S3 버킷과 객체의 권한을 설정하여 웹에 공개하기]
    http://wildpup.cafe24.com/archives/804

    [AWS S3의 버저닝(Versioning) 기능 사용하기]
    http://wildpup.cafe24.com/archives/821

    [AWS S3와 CloudFront 사용하기]
    http://wildpup.cafe24.com/archives/830

    [AWS CloudWatch와 Alarm 생성]
    http://wildpup.cafe24.com/archives/847

    [AWS ELB를 이용한 요청분배]
    http://wildpup.cafe24.com/archives/867

    [AWS Auto Scaling을 이용하여 EC2 인스턴스를 자동으로 확장하기]
    http://wildpup.cafe24.com/archives/890

    [AWS Access Key와 Secret Key를 만들고 CLI 사용해보기]
    http://wildpup.cafe24.com/archives/929

    [AWS SQS 간단히 사용해 보기]
    http://wildpup.cafe24.com/archives/945

    [AWS CloudFormation을 이용하여 서버 구성하기]
    http://wildpup.cafe24.com/archives/971

    [AWS SES의 소개와 간단한 사용법]
    http://wildpup.cafe24.com/archives/1003

    [AWS ElastiCache의 소개와 간단한 사용(Memcached)]
    반응형
    블로그 이미지

    조이풀 라이프

    Lift is short, enjoy the life

    ,