1.RVM(Ruby Version Manager) 설치


$ sudo apt-get update

$ sudo apt-get install curl

$ crul -L https://get.rvm.io | bash -s stable --ruby

설치하다가 "Can't check signature: public key not found" 에러가 나오며 설치 중단되는데, 화면에 나온데로 gpg --keyserver로 시작하는 명령을 실행하면 된다.

$gpg --keyserver  hkp://keys.gnupg.net --recv-keys 40......

$ crul -L https://get.rvm.io | bash -s stable --ruby       #(다시 실행하면 설치 계속)

$ source /home/username/.rvm/scripts/rvm


2. Requirement 업데이트 

$ rvm reuqirements


3. Ruby 설치와 버전 선택


설치

$ rvm install 2.3.0

or

$ rvm reinstall 2.3.0


사용 버전 선택

$ rvm use 2.3.0


Defalut 사용 버전 설정


$rvm --default 2.3.0


4. Rail 설치와 버전 선택

Rail 설치

$ gem install rails            #(여기서 시간이 좀 걸린다)


Rail 설치 버전 확인

$gem list --local rails


Rail 버전 설치

$gem install rails --version 4.2.0


Rail 버전 선택

$gem _4.2.0_ --version


버전 확인

$ ruby -v && rails -v

ruby 2.3.0p0 (2015-12-25 revision 53290) [x86_64-linux]

Rails 4.2.6

 
반응형
블로그 이미지

조이풀 라이프

Lift is short, enjoy the life

,

Jupyter Notebook Python, Scala, R, Spark, Mesos Stack

[Git Hub] https://github.com/jupyter/docker-stacks/tree/master/all-spark-notebook


What it Gives You


  • Jupyter Notebook 4.2.x
  • Conda Python 3.x and Python 2.7.x environments
  • Conda R 3.2.x environment
  • Scala 2.10.x
  • pyspark, pandas, matplotlib, scipy, seaborn, scikit-learn pre-installed for Python
  • ggplot2, rcurl preinstalled for R
  • Spark 1.6.0 for use in local mode or to connect to a cluster of Spark workers
  • Mesos client 0.22 binary that can communicate with a Mesos master
  • Unprivileged user jovyan (uid=1000, configurable, see options) in group users (gid=100) with ownership over /home/jovyan and /opt/conda
  • tini as the container entrypoint and start-notebook.sh as the default command
  • A start-singleuser.sh script for use as an alternate command that runs a single-user instance of the Notebook server, as required by JupyterHub
  • Options for HTTPS, password auth, and passwordless sudo

Basic Use

The following command starts a container with the Notebook server listening for HTTP connections on port 8888 without authentication configured.

docker run -d -p 8888:8888 jupyter/all-spark-notebook

Using Spark Local Mode


This configuration is nice for using Spark on small, local data.

In a Python Notebook

  1. Run the container as shown above.
  2. Open a Python 2 or 3 notebook.
  3. Create a SparkContext configured for local mode.

For example, the first few cells in a notebook might read:

import pyspark
sc = pyspark.SparkContext('local[*]')

# do something to prove it works
rdd = sc.parallelize(range(1000))
rdd.takeSample(False, 5)

In a R Notebook

  1. Run the container as shown above.
  2. Open a R notebook.
  3. Initialize sparkR for local mode.
  4. Initialize sparkRSQL.

For example, the first few cells in a R notebook might read:

library(SparkR)

sc <- sparkR.init("local[*]")
sqlContext <- sparkRSQL.init(sc)

# do something to prove it works
data(iris)
df <- createDataFrame(sqlContext, iris)
head(filter(df, df$Petal_Width > 0.2))


In an Apache Toree (Scala) Notebook

  1. Run the container as shown above.
  2. Open an Apache Toree (Scala) notebook.
  3. Use the pre-configured SparkContext in variable sc.


For example:

val rdd = sc.parallelize(0 to 999)
rdd.takeSample(false, 5)

Connecting to a Spark Cluster on Mesos

This configuration allows your compute cluster to scale with your data.

  1. Deploy Spark on Mesos.
  2. Configure each slave with the --no-switch_user flag or create the jovyan user on every slave node.
  3. Run the Docker container with --net=host in a location that is network addressable by all of your Spark workers. (This is a Spark networking requirement.)
  4. Follow the language specific instructions below.

 In a Python Notebook

  1. Open a Python 2 or 3 notebook.
  2. Create a SparkConf instance in a new notebook pointing to your Mesos master node (or Zookeeper instance) and Spark binary package location.
  3. Create a SparkContext using this configuration.

For example, the first few cells in a Python 3 notebook might read:


import os # make sure pyspark tells workers to use python3 not 2 if both are installed os.environ['PYSPARK_PYTHON'] = '/usr/bin/python3' import pyspark conf = pyspark.SparkConf() # point to mesos master or zookeeper entry (e.g., zk://10.10.10.10:2181/mesos) conf.setMaster("mesos://10.10.10.10:5050")

# point to spark binary package in HDFS or on local filesystem on all slave # nodes (e.g., file:///opt/spark/spark-1.6.0-bin-hadoop2.6.tgz) conf.set("spark.executor.uri", "hdfs://10.10.10.10/spark/spark-1.6.0-bin-hadoop2.6.tgz") # set other options as desired conf.set("spark.executor.memory", "8g") conf.set("spark.core.connection.ack.wait.timeout", "1200") # create the context sc = pyspark.SparkContext(conf=conf) # do something to prove it works rdd = sc.parallelize(range(100000000)) rdd.sumApprox(3)

To use Python 2 in the notebook and on the workers, change the PYSPARK_PYTHON environment variable to point to the location of the Python 2.x interpreter binary. If you leave this environment variable unset, it defaults to python.

Of course, all of this can be hidden in an IPython kernel startup script, but "explicit is better than implicit." :)

In a R Notebook

  1. Run the container as shown above.
  2. Open a R notebook.
  3. Initialize sparkR Mesos master node (or Zookeeper instance) and Spark binary package location.
  4. Initialize sparkRSQL.

For example, the first few cells in a R notebook might read:

library(SparkR)

# point to mesos master or zookeeper entry (e.g., zk://10.10.10.10:2181/mesos)\
# as the first argument
# point to spark binary package in HDFS or on local filesystem on all slave
# nodes (e.g., file:///opt/spark/spark-1.6.0-bin-hadoop2.6.tgz) in sparkEnvir
# set other options in sparkEnvir
sc <- sparkR.init("mesos://10.10.10.10:5050", sparkEnvir=list(
    spark.executor.uri="hdfs://10.10.10.10/spark/spark-1.6.0-bin-hadoop2.6.tgz",
    spark.executor.memory="8g"
    )
)
sqlContext <- sparkRSQL.init(sc)

# do something to prove it works
data(iris)
df <- createDataFrame(sqlContext, iris)
head(filter(df, df$Petal_Width > 0.2))


In an Apache Toree (Scala) Notebook

  1. Open a terminal via New -> Terminal in the notebook interface.
  2. Add information about your cluster to the SPARK_OPTS environment variable when running the container.
  3. Open an Apache Toree (Scala) notebook.
  4. Use the pre-configured SparkContext in variable sc.

The Apache Toree kernel automatically creates a SparkContext when it starts based on configuration information from its command line arguments and environment variables. You can pass information about your Mesos cluster via the SPARK_OPTS environment variable when you spawn a container.

For instance, to pass information about a Mesos master, Spark binary location in HDFS, and an executor options, you could start the container like so:

docker run -d -p 8888:8888 -e SPARK_OPTS '--master=mesos://10.10.10.10:5050 \ --spark.executor.uri=hdfs://10.10.10.10/spark/spark-1.6.0-bin-hadoop2.6.tgz \ --spark.executor.memory=8g' jupyter/all-spark-notebook

Note that this is the same information expressed in a notebook in the Python case above. Once the kernel spec has your cluster information, you can test your cluster in an Apache Toree notebook like so:

// should print the value of --master in the kernel spec
println(sc.master)

// do something to prove it works
val rdd = sc.parallelize(0 to 99999999)
rdd.sum()

 Connecting to a Spark Cluster on Standalone Mode


Connection to Spark Cluster on Standalone Mode requires the following set of steps:

  1. Verify that the docker image (check the Dockerfile) and the Spark Cluster which is being deployed, run the same version of Spark.
  2. Deploy Spark on Standalone Mode.
  3. Run the Docker container with --net=host in a location that is network addressable by all of your Spark workers. (This is a Spark networking requirement.)
  4. The language specific instructions are almost same as mentioned above for Mesos, only the master url would now be something like spark://10.10.10.10:7077

Notebook Options

You can pass Jupyter command line options through the start-notebook.sh command when launching the container. For example, to set the base URL of the notebook server you might do the following:

docker run -d -p 8888:8888 jupyter/all-spark-notebook start-notebook.sh --NotebookApp.base_url=/some/path


You can sidestep the start-notebook.sh script entirely by specifying a command other than start-notebook.sh. If you do, the NB_UID and GRANT_SUDO features documented below will not work. See the Docker Options section for details.


Docker Options

You may customize the execution of the Docker container and the Notebook server it contains with the following optional arguments.

  • -e PASSWORD="YOURPASS" - Configures Jupyter Notebook to require the given password. Should be conbined with USE_HTTPS on untrusted networks.
  • -e USE_HTTPS=yes - Configures Jupyter Notebook to accept encrypted HTTPS connections. If a pem file containing a SSL certificate and key is not provided (see below), the container will generate a self-signed certificate for you.
  • -e NB_UID=1000 - Specify the uid of the jovyan user. Useful to mount host volumes with specific file ownership. For this option to take effect, you must run the container with --user root. (The start-notebook.sh script will su jovyan after adjusting the user id.)
  • -e GRANT_SUDO=yes - Gives the jovyan user passwordless sudo capability. Useful for installing OS packages. For this option to take effect, you must run the container with --user root. (The start-notebook.sh script will su jovyan after adding jovyan to sudoers.) You should only enable sudo if you trust the user or if the container is running on an isolated host.
  • -v /some/host/folder/for/work:/home/jovyan/work - Host mounts the default working directory on the host to preserve work even when the container is destroyed and recreated (e.g., during an upgrade).
  • -v /some/host/folder/for/server.pem:/home/jovyan/.local/share/jupyter/notebook.pem - Mounts a SSL certificate plus key for USE_HTTPS. Useful if you have a real certificate for the domain under which you are running the Notebook server.
  • -p 4040:4040 - Opens the port for the Spark Monitoring and Instrumentation UI. Note every new spark context that is created is put onto an incrementing port (ie. 4040, 4041, 4042, etc.), and it might be necessary to open multiple ports. docker run -d -p 8888:8888 -p 4040:4040 -p 4041:4041 jupyter/all-spark-notebook

SSL Certificates

The notebook server configuration in this Docker image expects the notebook.pem file mentioned above to contain a base64 encoded SSL key and at least one base64 encoded SSL certificate. The file may contain additional certificates (e.g., intermediate and root certificates).

If you have your key and certificate(s) as separate files, you must concatenate them together into the single expected PEM file. Alternatively, you can build your own configuration and Docker image in which you pass the key and certificate separately.

For additional information about using SSL, see the following:

Conda Environments

The default Python 3.x Conda environment resides in /opt/conda. A second Python 2.x Conda environment exists in /opt/conda/envs/python2. You can switch to the python2 environment in a shell by entering the following:

source activate python2


You can return to the default environment with this command:

source deactivate


The commands jupyter, ipython, python, pip, easy_install, and conda (among others) are available in both environments. For convenience, you can install packages into either environment regardless of what environment is currently active using commands like the following:

# install a package into the python2 environment
pip2 install some-package
conda install -n python2 some-package
# install a package into the default (python 3.x) environment
pip3 install some-packageconda 
install -n python3 some-package


JupyterHub


JupyterHub requires a single-user instance of the Jupyter Notebook server per user. To use this stack with JupyterHub and DockerSpawner, you must specify the container image name and override the default container run command in your jupyterhub_config.py:

# Spawn user containers from this image
c.DockerSpawner.container_image = 'jupyter/all-spark-notebook'

# Have the Spawner override the Docker run command
c.DockerSpawner.extra_create_kwargs.update({
    'command': '/usr/local/bin/start-singleuser.sh'
})
반응형

'IT > Apache Spark' 카테고리의 다른 글

Docker를 이용한 Apache Spark 설치하기  (0) 2016.06.06
블로그 이미지

조이풀 라이프

Lift is short, enjoy the life

,

Docker Hub 이미지를 이용한 Spark 설치하기


Apacher Spark 이미지

Docker Hub 이미지 중 가장많은 별포인트를 받은 아래의 Spark 이미지를 설치한다.

[Docker Hub] https://hub.docker.com/r/jupyter/all-spark-notebook/

[Git Hub] https://github.com/jupyter/docker-stacks


아래 명령어로 docker hub에서 이미지를 가져온다.


sudo docker pull jupyter/all-spark-notebook  


위의 명령어를 실행하면 아래와 같이 이미지를 다운받고 extract 하는 과정을 볼 수가 있다.


Image 다운이 다 되었으면, 아래의 명령어를 통해 다운 받은 Docker Image를 확인할 수가 있다.


sudo docker images


제대로 설치가 되었다면 아래와 유사한 목록 리스트가 나타나야 한다.


sudo docker images


컨테이너를 만들고 실행시키기 위해서 아래의 명령어를 이용한다.


sudo docker run -d -p [외부포트]:[컨테이너내부포트] -e GRANT_SUDO=yes --name [컨테이너 이름] jupyter/all-spark-notebook

ex) sudo docker run -d -p 8888:8888 -e GRANT_SUDO=yes --name test_spark jupyer/all-spark-notebook

ex) sudo docker run -d -p 8888:8888 jupyter/all-spark-notebook


docker ps 명령을 통해 해당 컨테이너가 잘 실행되었는지를 확인하자.


sudo docker ps


방금 만든 컨테이너가 보인다면, 해당 서비스가 잘 구동되어 있음을 나타내는 것이다.

이제 웹상에서 해당 machine의 ip와 port(ex) 8888)를 친후 ipython-notebook을 실행해보자.


[Docke Hub] https://hub.docker.com/r/sequenceiq/spark/

Apache Spark on Docker


This repository contains a Docker file to build a Docker image with Apache Spark. This Docker image depends on our previous Hadoop Docker

image, available at the SequenceIQ GitHub page.
The base Hadoop Docker image is also available as an official Docker image.

##Pull the image from Docker Repository


docker pull sequenceiq/spark:1.6.0

Building the image

docker build --rm -t sequenceiq/spark:1.6.0 .

Running the image

  • if using boot2docker make sure your VM has more than 2GB memory
  • in your /etc/hosts file add $(boot2docker ip) as host 'sandbox' to make it easier to access your sandbox UI
  • open yarn UI ports when running container
    docker run -it -p 8088:8088 -p 8042:8042 -h sandbox sequenceiq/spark:1.6.0 bash
    
    or
    docker run -d -h sandbox sequenceiq/spark:1.6.0 -d

Versions

Hadoop 2.6.0 and Apache Spark v1.6.0 on Centos


Testing

There are two deploy modes that can be used to launch Spark applications on YARN.

YARN-client mode

In yarn-client mode, the driver runs in the client process, and the application master is only used for requesting resources from YARN.

# run the spark shell
spark-shell \
--master yarn-client \
--driver-memory 1g \
--executor-memory 1g \
--executor-cores 1

# execute the the following command which should return 1000
scala> sc.parallelize(1 to 1000).count()


YARN-cluster mode

In yarn-cluster mode, the Spark driver runs inside an application master process which is managed by YARN on the cluster, and the client can go away after initiating the application.

Estimating Pi (yarn-cluster mode):

# execute the the following command which should write the "Pi is roughly 3.1418" into the logs
# note you must specify --files argument in cluster mode to enable metrics
spark-submit \
--class org.apache.spark.examples.SparkPi \
--files $SPARK_HOME/conf/metrics.properties \
--master yarn-cluster \
--driver-memory 1g \
--executor-memory 1g \
--executor-cores 1 \
$SPARK_HOME/lib/spark-examples-1.6.0-hadoop2.6.0.jar

Estimating Pi (yarn-client mode):

# execute the the following command which should print the "Pi is roughly 3.1418" to the screen
spark-submit \
--class org.apache.spark.examples.SparkPi \
--master yarn-client \
--driver-memory 1g \
--executor-memory 1g \
--executor-cores 1 \
$SPARK_HOME/lib/spark-examples-1.6.0-hadoop2.6.0.jar
반응형

'IT > Apache Spark' 카테고리의 다른 글

Docker Jupyter Notebook Python, Scala, R, Spark, Mesos Stack  (0) 2016.06.06
블로그 이미지

조이풀 라이프

Lift is short, enjoy the life

,

Docker 설치 및 기본 사용 방법

간단한 설치 방법 및 기본 사용 방법에 대해 설명하도록 하겠습니다.


Amazon Web Services(AWS) EC2(Ubuntu)를 생성

(기본으로 AWS의 EC2에서는 docker 패키지를 사용 가능)


docker 설치

$ sudo apt-get install docker.io


서비스 등록

$ sudo update-rc.d docker.io defaults


Docker Engine 정보 확인

$ sudo docker.io info

Containers: 0

Images: 0

Storage Driver: devicemapper

 Pool Name: docker-202:1-18845-pool

 Data file: /var/lib/docker/devicemapper/devicemapper/data

 Metadata file: /var/lib/docker/devicemapper/devicemapper/metadata

 Data Space Used: 291.5 Mb

 Data Space Total: 102400.0 Mb

 Metadata Space Used: 0.7 Mb

 Metadata Space Total: 2048.0 Mb

Execution Driver: native-0.1

Kernel Version: 3.13.0-24-generic

WARNING: No swap limit support


docker 명령어로 사용하기 위한 심볼릭 링크 생성

$ sudo ln -sf /usr/bin/docker.io /usr/local/bin/docker


docker 명령어에 대한 권한 부여 (ubuntu도 사용할 수 있도록)

$ sudo usermod -G docker ubuntu


ubuntu 사용자로 logout->login하고 docker info 명령어 실행

$ docker info

Containers: 0

Images: 0

Storage Driver: devicemapper

 Pool Name: docker-202:1-18845-pool

 Data file: /var/lib/docker/devicemapper/devicemapper/data

 Metadata file: /var/lib/docker/devicemapper/devicemapper/metadata

 Data Space Used: 291.5 Mb

 Data Space Total: 102400.0 Mb

 Metadata Space Used: 0.7 Mb

 Metadata Space Total: 2048.0 Mb

Execution Driver: native-0.1

Kernel Version: 3.13.0-24-generic

WARNING: No swap limit support


Dicker 클라이언트 / 서버 확인

$ docker version

Client version: 0.9.1

Go version (client): go1.2.1

Git commit (client): 3600720

Server version: 0.9.1

Git commit (server): 3600720

Go version (server): go1.2.1

Last stable version: 1.0.0, please update docker


ubuntu 이미지 Docker Hub Regstry에서 다운로드

$ docker pull ubuntu:latest

Pulling repository ubuntu

ad892dd21d60: Download complete

511136ea3c5a: Download complete

e465fff03bce: Download complete

23f361102fae: Download complete

9db365ecbcbb: Download complete 


다운로드 이미지 확인

$ docker images

REPOSITORY          TAG                 IMAGE ID            CREATED             VIRTUAL SIZE

ubuntu              latest              ad892dd21d60        7 days ago          275.4 MB 


Docker Container 생성 및 실행

$ docker run [옵션] [--name {컨테이너명}] {이미지명}[:{태그명}] [컨테이너로 실행할 명령어] [변수]


중요 옵션

-d : 백그라우드 실행. 

-i : 컨터이너의 표준 입력. /bin/bash등으로 컨테이너를 조작할 때 지정.

-t : tty(단말 디바이스)를 확보. /bin/bash등으로 컨테이너를 조작할 때 지정.

-p {호스트 포트번호} : {컨테이너 포트번호}  : Docker서버의 호스트와 포트 맵핑을 구성


ubuntu이미지에서 ubuntu1 컨테이너를 생성

$ docker run -it --name ubuntu1 ubuntu /bin/bash

root@b5c2f7a3f4de:/# 


nginx 설치 및 확인

root@b5c2f7a3f4de:/# apt-get update

root@b5c2f7a3f4de:/# apt-get install -y nginx


root@b5c2f7a3f4de:/# dpkg -l nginx

Desired=Unknown/Install/Remove/Purge/Hold

| Status=Not/Inst/Conf-files/Unpacked/halF-conf/Half-inst/trig-aWait/Trig-pend

|/ Err?=(none)/Reinst-required (Status,Err: uppercase=bad)

||/ Name                                                 Version                         Architecture                    Description

+++-====================================================-===============================-===============================-==============================================================================================================


ii  nginx                                                1.4.6-1ubuntu3                  all                             small, powerful, scalable web/proxy server

root@b5c2f7a3f4de:/# 


[Ctrl]+[d]로 bash 종료

- 종료하면 컨테이너 ubuntu1은 정지 상태가 된다.


Docker 컨테이너 리스트 확인

$ docker ps -a

CONTAINER ID        IMAGE               COMMAND             CREATED             STATUS              PORTS               NAMES

b5c2f7a3f4de        ubuntu:latest       /bin/bash           12 minutes ago      Exit 0                                ubuntu1  


STATUS 항목 - 실행중 = UP {실행시간} / 정지 = Exit {종료코드}


Docker 이미지 생성

$ docker commit {컨테이너명}|{컨테이너 ID} [{사용자명}/]{이미지명}


$ docker commit ubuntu1 park/nginx

948a317510591c8af2ca49e205cc0558141ce5e18acc98c0e834cc8e93cf86cd


생성된 이미지 확인

$ docker images

REPOSITORY          TAG                 IMAGE ID            CREATED             VIRTUAL SIZE

park/nginx          latest              948a31751059        2 minutes ago       295.9 MB

ubuntu              latest              ad892dd21d60        7 days ago          275.4 MB


Docker 컨테이너를 백그라운드에서 실행

$ docker run -d -p 80:80 --name nginx1 park/nginx /usr/sbin/nginx -g 'daemon off;' -c /etc/nginx/nginx.conf

06f09849c046f5a949e7d82f52b140cfecd85b2d5f813a12c0adb431a5ea7a52


컨테이너 실행 상태 확인

$ docker ps

CONTAINER ID        IMAGE               COMMAND                CREATED             STATUS              PORTS                NAMES

06f09849c046        park/nginx:latest   /usr/sbin/nginx -g d   27 seconds ago      Up 25 seconds       0.0.0.0:80->80/tcp   nginx1


웹 서비스 기동 상태 확인

$ curl localhost:80


Docker 컨테이너 정지

$ docker stop {컨테이너명}|{컨테이너 ID}


$ docker stop nginx1

nginx1


$ docker ps

CONTAINER ID        IMAGE               COMMAND             CREATED             STATUS              PORTS               NAMES


Docker 컨테이너 삭제 및 이미지 삭제

$ docker rm {컨테이너명}|{컨테이너 ID} => 컨테이너 삭제

$ docker rmi {이미지명}|{이미지ID} => 이미지 삭


$ docker ps -a

CONTAINER ID        IMAGE               COMMAND                CREATED             STATUS              PORTS               NAMES

06f09849c046        park/nginx:latest   /usr/sbin/nginx -g d   17 minutes ago      Exit 0                                  nginx1

b5c2f7a3f4de        ubuntu:latest       /bin/bash              40 minutes ago      Exit 0                                  ubuntu1


컨테이너 삭제

$ docker rm nginx1

nginx1


$ docker ps -a

CONTAINER ID        IMAGE               COMMAND             CREATED             STATUS              PORTS               NAMES

b5c2f7a3f4de        ubuntu:latest       /bin/bash           40 minutes ago      Exit 0                                  ubuntu1


$ docker images

REPOSITORY          TAG                 IMAGE ID            CREATED             VIRTUAL SIZE

park/nginx          latest              948a31751059        25 minutes ago      295.9 MB

ubuntu              latest              ad892dd21d60        7 days ago          275.4 MB


이미지 삭제

$ docker rmi park/nginx

Untagged: park/nginx:latest

Deleted: 948a317510591c8af2ca49e205cc0558141ce5e18acc98c0e834cc8e93cf86cd


$ docker images

REPOSITORY          TAG                 IMAGE ID            CREATED             VIRTUAL SIZE

ubuntu              latest              ad892dd21d60        7 days ago          275.4 MB


Docker 컨테이너 실행

$ docker start [-i] {컨테이너명}|{컨테이너 ID}

$ docker start -i ubuntu1

ubuntu1

       root@b5c2f7a3f4de:/#


반응형
블로그 이미지

조이풀 라이프

Lift is short, enjoy the life

,

구글이 18일(현지시각) 미국 샌프란시스코에서 연례 개발자 컨퍼런스인 ‘구글 I/O’(events.google.com/io2016)를 개최했다.

올해 행사에서는 구글의 여러 변화점이 언급됐기 때문에 전세계의 이목이 집중됐다. 

실제로 올해 행사에서는 그동안 구글이 적극적으로 나서지 못했던 사물인터넷(Iot) 전략의 핵심인 ‘구글 홈’과 새로운 안드로이드 운영체제(OS) ‘안드로이드 N’의 3차 미리보기(프리뷰) 버전에 포함된 가상현실(VR) 모드가 주요 이슈로 꼽힌다. 특히 IoT분야에서 구글의 공격적인 행보가 눈에 띤다는 평가다.


구글 홈, 스마트홈서 한발 나아간 IoT = 올 연말에 출시될 구글 홈은 음성으로 작동하는 스피커 기기다. 여기에 음성인식 비서 서비스인 구글 어시스턴트가 적용돼 있다. 이에 따라 이용자가 일상에서 대화하듯 질문을 하거나 명령을 내릴 수 있다. 이를 통해 스마트폰에 손대지 않고도 인터넷 검색 결과를 알 수 있거나 스케줄 관리, 영화 예매 등도 가능하다.

이용자는 구글 홈을 통해 가정 내 안드로이드 운영체제(OS) 기반 기기를 제어할 수 있다. 구글 크롬캐스트와 연동돼 여타 스피커나 TV를 통해 미디어 콘텐츠를 감상할 수 있다. 구글 홈은 기존 스마트홈 기기인 구글 네스트와도 연동된다. 이를 통해 집안의 온도를 조절하거나 조명을 제어할 수도 있다.

이를 감안하면 구글 홈은 구글 안드로이드 생태계 꼭짓점에 위치하는 컨트롤타워인 셈이다. 구글 네스트의 영역을 포용해 스마트홈 이상의 사물인터넷(IoT)을 노리고 만든 제품이라는 것을 알 수 있다. 순다 피차이 구글 대표는 행사에서 “구글은 휴대폰을 비롯해 웨어러블(입는기기), 자동차, 가정 등 여러 부분에 컴퓨팅 기술을 적용하는 데 관심이 있다”고 말했다.

◆컨트롤러 갖추고 개선된 VR 경험 추구=안드로이드 N 3차 미리보기 버전은 고품질의 VR 체험을 위한 OS 지원을 크게 강화한 것이 특징이다. 싱글 버퍼 렌더링, VR 앱을 위한 전용 CPU 코어 액세스 등으로 개발자들은 보다 더 강력한 성능을 끌어낼 수 있게 됐다.

시선 이동에 따른 화면 업데이트 지연시간은 0.002초 수준을 구현했다. 구글 측은 “실제 다른 장소에 있는 것처럼 느낄 만큼 몰입도를 제공하기 위해 요구되는 속도”라고 설명했다.

행사 현장에선 올 가을 선보일 안드로이드 N 기반의 VR 전용 플랫폼 ‘데이드림’도 공개됐다. 데이드림은 앞서 공개된 카드보드와 달리 머리에 쓰는 디스플레이(HMD) 기기와 함께 무선 컨트롤러까지 포함된 것이 특징이다. 무선 컨트롤러는 이용자의 움직임을 감지, 게임 등 다양한 VR 콘텐츠에서 활용할 수 있다.

클레이 베이버 구글 VR 담당 부사장은 “삼성전자, LG전자 등 다양한 스마트폰 제조사들이 데이드림에 맞는 센서와 디스플레이 등을 탑재한 제품을 내놓을 것”이라고 말했다.

◆안드로이드웨어 2.0 등 공개=이와 함께 구글은 스마트시계 등에 탑재된 ‘안드로이드 웨어’의 2.0 개발자 버전을 공개했다. 올 가을에 정식 버전이 나온다. 2.0 버전에선 자립형(스탠드얼론) 앱을 사용해 블루투스나 와이파이(무선랜), 전화 연결을 가능하도록 했다. 때문에 블루투스로 연결된 스마트폰과 떨어져도 상관없다. 독자적으로 동작하는 것이 특징이다.

통합 개발 환경(IDE)을 위한 ‘안드로이드 스튜디오 2.2’ 미리보기 버전도 공개됐다. XML에서 벗어나 시각적으로 레이아웃을 구성하는 것을 돕거나 레이아웃을 다른 화면 크기에 자동으로 맞춰주기도 한다. 이에 따른 개발 속도 향상과 함께 APK 분석기, 안드로이드 코드 분석, 자바8 지원, 파이어베이스 지원 등의 기능도 갖췄다.


구글은 글로벌 앱 마켓 ‘구글플레이’의 개발자 콘솔 기능도 강화했다. 베타테스트 중이다. 이에 따라 개발자들은 앱 출시 전 보고서를 받고 오류를 수정하거나 앱 환경을 개선시킬 수 있게 됐다. 국가별 사용자 유입 데이터를 확인할 수 있으며 곧 사용자 유입 벤치마크나 비슷한 앱과 비교했을 때 앱 전환율이 어느 정도인지도 파악할 수 있게 된다.
반응형

'IT > Android' 카테고리의 다른 글

[Android] 안드로이드 버전별 해상도  (0) 2020.11.29
[Android] 안드로이드 API 레벨과 OS 버전  (0) 2020.11.29
Google I/O 2016  (0) 2016.05.18
Google ExoPlayer 소개  (0) 2016.05.10
블로그 이미지

조이풀 라이프

Lift is short, enjoy the life

,

Google I/O 2016

IT/Android 2016. 5. 18. 11:42


미국 시간 2016년 5월 18일 10시에 구글에서 매년 개최하는 Google I/0 2016이 개최된다.

자세한 일정은 아래 사이트를 참고하면 됩니다.

https://events.google.com/io2016/


5월 18일 10시 키노트 발표를 시작으로 다양한 분야에 걸쳐서 세션 발표가 진행된다.

올해 발표될 아이템에 대한 예측 기사는 아래의 링크를 참고하시기 바랍니다.

http://www.ciokorea.com/column/29646

1. 증강 현실, 가상 현실 및 360도 비디오

2. 더 많은 개발자를 위한 인공 지능과 머신러닝

3. 파이어베이스 개발 가속화와 가격 인하

4. 파이어베이스의 사물 인터넷 확장

5. 안드로이드 N 

6. 크롬 OS의 통합과 확장

7. 프로젝트 오라

8. 프로그레시브 웹 앱 개발용 오픈소스 프레임워크

9. 개선된 온허브

반응형
블로그 이미지

조이풀 라이프

Lift is short, enjoy the life

,

라즈베리파이를 이용한 아마존 에코 서비스를 만들기 위한 오프소스 프로젝트가 진행되고 있다.

아래의 링크를 방문하면 자세한 소스 코드 및 설명이 소개되어 있다.

https://github.com/amzn/alexa-avs-raspberry-pi


Project: Raspberry Pi + Alexa Voice Service

About the Project

This project demonstrates how to access and test the Alexa Voice Service using a Java client (running on a Raspberry Pi), and a Node.js server. You will be using the Node.js server to get a Login with Amazon authorization code by visiting a website using your computer's (Raspberry Pi in this case) web browser.

This guide provides step-by-step instructions for obtaining the sample code, the dependencies, and the hardware you need to get the reference implementation running on your Pi. For Windows, Mac, or generic linux instructions, see this guide.


Getting Started

Hardware you need

  1. Raspberry Pi 2 (Model B) - Buy at Amazon. UPDATE: Even though this guide was built using a Raspberry Pi 2, it should work just fine with a Raspberry Pi 3 as well. Pi 1 users - please see this thread for help.
  2. Micro-USB power cable for Raspberry Pi (included with Raspberry Pi)
  3. Micro SD Card - To get started with Raspberry Pi you need an operating system. NOOBS (New Out Of the Box Software) is an easy-to-use operating system install manager for the Raspberry Pi. The simplest way to get NOOBS is to buy an SD card with NOOBS preinstalled - Raspberry Pi 8GB Preloaded (NOOBS) Micro SD Card
  4. An Ethernet cable
  5. USB 2.0 Mini Microphone - Raspberry Pi does not have a built-in microphone; to interact with Alexa you'll need an external one to plug in - Buy at Amazon
  6. External Speaker with 3.5mm audio socket/stereo headset jack - Buy at Amazon
  7. A USB Keyboard & Mouse, and an external HDMI Monitor - we also recommend having a USB keyboard and mouse as well as an HDMI monitor handy if for some reason you can’t “SSH” into your Raspberry Pi. More on “SSH” later.
  8. WiFi Wireless Adapter (Optional) Buy at Amazon

Skills you need

  1. Basic programming experience
  2. Familiarity with shell


반응형

'IT > IoT' 카테고리의 다른 글

라즈베리파이 OS설치부터 기본 설정하기  (0) 2016.05.11
블로그 이미지

조이풀 라이프

Lift is short, enjoy the life

,


[라즈베리파이 상세 설명]

아래의 라즈베리파이 공식 홈페이지를 참조하시기 바랍니다.

https://www.raspberrypi.org/

http://www.leocom.kr/RaspberryPi/Default.aspx


[OS 인스톨하기]

아래 경로의 링크로 가셔서 원하시는 OS 선택해서 설치하면 됩니다.

https://www.raspberrypi.org/downloads/

Raspbian is the Foundation’s official supported Operating System. Download it here, or use NOOBS, our easy installer for Raspbian and more.


다운로드 받은 ZIP 파일의 압축을 풀면, img 파일이 나온다. 라즈베리파이에 사용할 SD 카드를 PC에 넣고 이 이미지 파일을 SD 카드에 굽는다. 윈도우에서는 Win32 Disk Imager를 이용해서 이미지 파일을 구울 수 있다. Win 32 Disk Imager는 https://sourceforge.net/projects/win32diskimager/ 에서 다운로드 받아 설치하면 된다.


[Win32 Disk Imager를 이용한 이미지 굽기]


[기본 설정]


1. 디스크 용량 확장하기

Mico Flash Disk의 용량 모두 사용하기 위해서 디스크 용량 확장하기가 필요합니다.


SD카드 전부 활용하도록 해줍시다.

터미널에서 raspi-config 

- expand_rootfs

- 재부팅


2. 비밀번호 설정

리눅스를 깐 후에 비밀번호 설정은 기본!

sudo passwd 쳐서 현재 계정(기본계정 pi) 의 비밀번호를 설정합니다.

기존 비밀번호는 raspberry

sudo passwd root를 쳐서 root계정의 비밀번호를 설정합니다


3. 인터넷 잡아주기

 
cd /etc/network 경로에서 sudo nano interfaces 를 치면 interfaces 문서가 열리는데

여기보면 iface eth0 inet manual이라고 되어있을 겁니다.

manual을 dhcp로 바꿔주세요.


무선랜은 iface wlan0 inet manual에서 manual을 dhcp로 바꾸고

그 아래에wpa-roam 이거 주석처리하고 (#이 주석) 

wpa-ssid "와이파이 SSID

wpa-psk "비번"


4. 업데이트 

(인터넷 연결 필수)

sudo apt-get update

sudo apt-get upgrade


5. 한글 입력기 설치


sudo apt-get install ibus ibus-hangul


반응형

'IT > IoT' 카테고리의 다른 글

라즈베리파이를 이용한 아마존 에코 서비스 만들기  (0) 2016.05.11
블로그 이미지

조이풀 라이프

Lift is short, enjoy the life

,

머신러닝 입문을 위한 좋은 강의 소개


이번에 소개드릴 강의는 홍콩 과기대에 교수로 계시는 김성훈 교수님의 유튜브 강의 및 Lecture Note를 소개합니다.


[유튜브 강의]

https://www.youtube.com/playlist?list=PLlMkM4tgfjnLSOjrEJN31gZATbcj_MpUm


유튜브 강의에 대한 자세한 자료는 아래의 Github에 소개되어 있습니다.


[Github 강의 소개]

http://hunkim.github.io/ml/ 

모두를 위한 머신러닝과 딥러닝의 강의

알파고와 이세돌의 경기를 보면서 이제 머신 러닝이 인간이 잘 한다고 여겨진 직관과 의사 결정능력에서도 충분한 데이타가 있으면 어느정도 또는 우리보다 더 잘할수도 있다는 생각을 많이 하게 되었습니다. Andrew Ng 교수님이 말씀하신것 처럼 이런 시대에 머신 러닝을 잘 이해하고 잘 다룰수 있다면 그야말로 "Super Power"를 가지게 되는 것이 아닌가 생각합니다.

더 많은 분들이 머신 러닝과 딥러닝에 대해 더 이해하고 본인들의 문제를 이 멋진 도구를 이용해서 풀수 있게 하기위해 비디오 강의를 준비하였습니다. 더 나아가 이론에만 그치지 않고 최근 구글이 공개한 머신러닝을 위한 오픈소스인 TensorFlow를 이용해서 이론을 구현해 볼수 있도록 하였습니다.

수학이나 컴퓨터 공학적인 지식이 없이도 쉽게 볼수 있도록 만들려고 노력하였습니다.

시즌 2 - 계획중입니다.

  • Word2Vec, NLP, QA, TF Serving, 분산환경등을 계획중이며 주제에 대한 많은 요청이 있으면 진행합니다. 요청 이메일: hunkim+ml@gmail.com
  • 시즌 1 - 딥러닝의 기본 (곧 종료)

    Acknowledgement

    이 비디오는 저도 인터넷등을 통해 공부하면서 만든것이며 아래 자료를 많이 사용하였습니다.


    반응형

    'IT > 머신러닝' 카테고리의 다른 글

    Windows 10에 Tensor Flow 설치하여 머신러닝 사용하기  (0) 2016.12.05
    AWS에 Tensorflow 설치하기  (0) 2016.05.10
    블로그 이미지

    조이풀 라이프

    Lift is short, enjoy the life

    ,

    Functional Programming Principles in Scala

    함수 언어의 한 종류인 스칼라에 대해서 소개해 드립니다.

    자세한 스칼라 언어소개는 아래의 위키를 참조하시기 바랍니다.

    https://ko.wikipedia.org/wiki/%EC%8A%A4%EC%B9%BC%EB%9D%BC_(%ED%94%84%EB%A1%9C%EA%B7%B8%EB%9E%98%EB%B0%8D_%EC%96%B8%EC%96%B4)


    아래 링크는 스칼라 언어 창시자인 마틴 오더스키(Martin Odersky) 교수님께서 강의를 진행한 교세라 링크입니다.

    https://www.coursera.org/course/progfun

    교세라 강의는 스칼라 개발 환경 셋팅부터 7주에 걸쳐 스칼라 강의를 진행하며 Lecture Note, Video 강의를 제공합니다.

    Tools Setup


    In order to work on the programming assignments, you need to have the following tools installed on your machine:

    • JDK, the Java Development Kit, version 1.7 or 1.8
    • Sbt, a build tool for Scala, version 0.13.x
    • The Scala IDE for Eclipse (or another IDE of your choice)

    Please follow the instructions on this page carefully.

    Installing the JDK

    Linux

    • Ubuntu, Debian: To install the JDK using apt-get, execute the following command in a terminal sudo apt-get install openjdk-7-jdk
    • Fedora, Oracle, Red Had: To install the JDK using yum, execute the following command in a terminal su -c "yum install java-1.7.0-openjdk-devel"
    • Manual Installation: To install the JDK manually on a Linux system, follow these steps:
      1. Download the .tar.gz archive from http://www.oracle.com/technetwork/java/javase/downloads/jdk7-downloads-1880260.html
      2. Unpack the downloaded archive to a directory of your choice
      3. Add the bin/ directory of the extracted JDK to the PATH environment variable. Open the file ~/.bashrc in an editor (create it if it doesn't exist) and add the following line export PATH=/PATH/TO/YOUR/jdk1.7.0-VERSION/bin:$PATH

    Verify your setup: Open a new terminal (to apply the changed .bashrc in case you did the manual installation) and type java -version. If you have problems installing the JDK, ask for help on the forums.

    Mac OS X

    Mac OS X either comes with a pre-installed JDK, or installs it automatically.

    To verify your JDK installation, open the Terminal application in /Applications/Utilities/ and type java -version. If the JDK is not yet installed, the system will ask you if you would like to download and install it.

    Windows

    To verify the JDK installation, open the Command Prompt and type java -version. If you have problems installing the JDK, ask for help on the forums.

    Installing sbtDonwload sbt for your platform here. Follow the instructions that page to get it running.

    This course requires sbt version 0.13.x. If you have previously installed sbt 0.12.x, you need to uninstall it and install a newer version. sbt 0.13.x can be used for projects and other courses requiring sbt 0.12.x, but not the other way around. If in doubt, you can check your currently installed sbt like this: in an arbitrary directory that is not a programming assignment or otherwise an sbt project, run:

    $ sbt --version

    You should see something like this:

    sbt launcher version 0.13.0

    If the sbt command is not found, or if you get a non-0.13.x version, you need to install sbt 0.13.x.

    Installing the Scala IDE for Eclipse with the Scala Worksheet (Linux / Mac OS X / Windows)

    You can download the Scala IDE for eclipse with the Scala Worksheet pre-installed from the following URL:

    http://scala-ide.org/download/sdk.html (Make sure to download the IDE for Scala version 2.11.x!)

    After downloading the archive for your operating system, simply unpack it and start eclipse. Eclipse requires you to select a workspace on startup. We recommend you create one workspace directory for this class and use it for all assignments.

    Hello World: Scala IDE and the Scala Worksheet

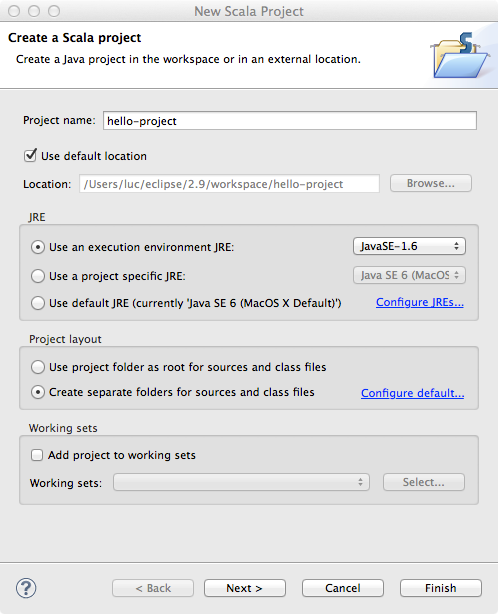
    To familiarize yourself with the Scala IDE, create a small "Hello World" project in eclipse:

    1. Go to "File" - "New" - "Other..." and select "Scala Project" from the folder "Scala Wizards"
    2. Chose a project name and select "Finish" 
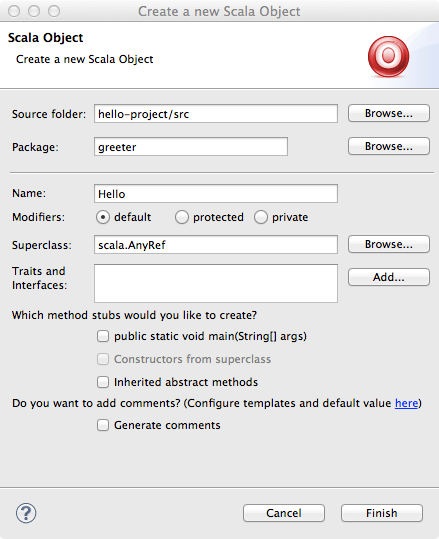
    3. Select "File" - "New" - "Scala Object" to create a new object
    4. Enter Hello as the name for the object and put greeter as the package name above 
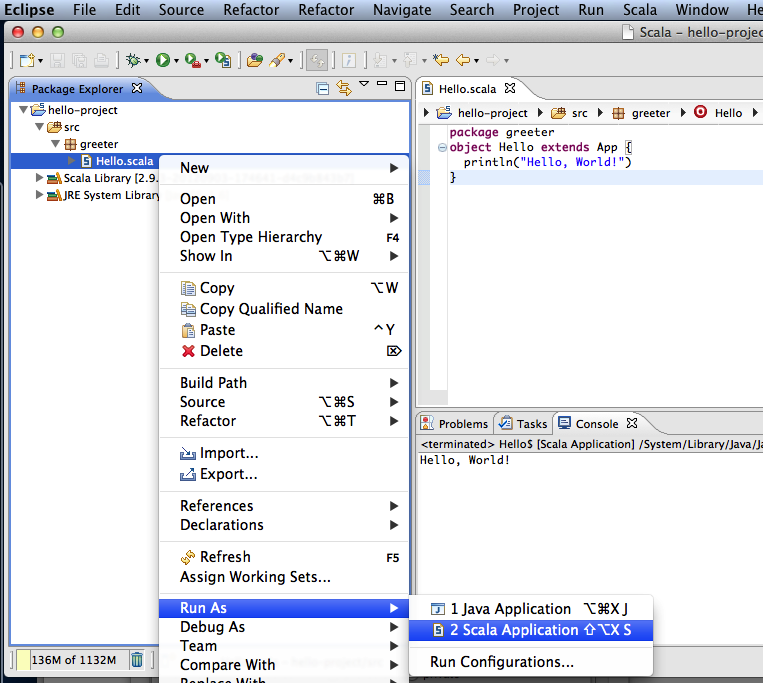
    5. Change the source code to the one given below [1]
    6. Save the file and select "Run" - "Run" from the menu. Chose to run as "Scala Application" 

    You should see a the hello world output in the Eclipse console.

    [1] Source code

    package greeter
    object Hello extends App {
      println("Hello, World!")
    }

    Creating a Scala Worksheet

    Creating a Scala Worksheet is very easy:

    1. Right-click on the package greeter in the hello world project that you just created
    2. Select "New" - "Scala Worksheet"
    3. Choose a name for your worksheet (different than Hello or the name you chose for the "Scala Object" before)

    Now you can type some Scala code into the worksheet. Every time you save the file, the content of the worksheet will be evaluated. Copy the following code into the object of your worksheet:

      val x = 1                                       //> x  : Int = 1
      def increase(i: Int) = i + 1                    //> increase: (i: Int)Int
      increase(x)                                     //> res0: Int = 2

    IntelliJ (optional alternative IDE)

    If you want to use the IntelliJ IDE instead of Eclipse, some guidance is provided through the IntelliJ tutorial page and the IntelliJ getting started video.


    Sbt Tutorial

    We use sbt for building, testing, running and submitting assignments. This tutorial explains all sbt commands that you will use during our class. The Tools Setup page explains how to install sbt.

    Starting up sbt

    In order to start sbt, open a terminal ("Command Prompt" in Windows) and navigate to the directory of the assignment you are working on. Typing sbt will open the sbt command prompt.

    shell$ cd /path/to/progfun-project-directory                        # This is the shell of the operating system
    shell$ sbt
    > _                                                                 # This is the sbt shell

    Running the Scala Interpreter

    You can start the Scala interpreter inside sbt using the console task. The interpreter (also called REPL, for "read-eval-print loop") is useful for trying out snippets of Scala code. Note that the interpreter can only be started if there are no compilation errors in your code.

    In order to quit the interpreter and get back to sbt, type ctrl-d.

    > console
    [info] Starting scala interpreter...
    Welcome to Scala version 2.11.5 (Java HotSpot(TM) 64-Bit Server VM, Java 1.7.0_04-ea).
    Type in expressions to have them evaluated.
    Type :help for more information.
    
    scala> println("Oh, hai!")                                          # This is the Scala REPL, type some Scala code
    Oh, hai!
    
    scala> val l = List(1, 2, 3)
    l: List[Int] = List(1, 2, 3)
    
    scala> val squares = l.map(x => x * x)
    squares: List[Int] = List(1, 4, 9)
    
    scala>                                                              # Type [ctrl-d] to exit the Scala REPL
    [success] Total time: 20 s, completed Mar 21, 2013 11:02:31 AM
    >                                                                   # We're back to the sbt shell

    Compiling your Code

    The compile task will compile the source code of the assignment which is located in the directory src/main/scala.

    > compile
    [info] Compiling 4 Scala sources to /Users/aleksandar/example/target/scala-2.11/classes...
    [success] Total time: 1 s, completed Mar 21, 2013 11:04:46 PM
    > 

    If the source code contains errors, the error messages from the compiler will be displayed.

    Testing your Code

    The directory src/test/scala contains unit tests for the project. In order to run these tests in sbt, you can use the test command.

    > test
    [info] ListsSuite:
    [info] - one plus one is two
    [info] - sum of a few numbers *** FAILED ***
    [info]   3 did not equal 2 (ListsSuite.scala:23)
    [info] - max of a few numbers
    [error] Failed: : Total 3, Failed 1, Errors 0, Passed 2, Skipped 0
    [error] Failed tests:
    [error]   example.ListsSuite
    [error] {file:/Users/luc/example/}assignment/test:test: Tests unsuccessful
    [error] Total time: 5 s, completed Aug 10, 2012 10:19:53 PM
    > 

    Running your Code

    If your project has an object with a main method (or an object extending the trait App), then you can run the code in sbt easily by typing run. In case sbt finds multiple main methods, it will ask you which one you'd like to execute.

    > run
    Multiple main classes detected, select one to run:
    
     [1] example.Lists
     [2] example.M2
    
    Enter number: 1
    
    [info] Running example.Lists 
    main method!
    [success] Total time: 33 s, completed Aug 10, 2012 10:25:06 PM
    >

    Submitting your Solution to Coursera

    The sbt task submit allows you to submit your solution for the assignment. It will pack your source code into a .jar file and upload it to the coursera servers. Note that the code can only be submitted if there are no compilation errors.

    The submit tasks takes two arguments: your Coursera e-mail address and the submission password. NOTE: the submission password is not your login password. Instead, it's a special password generated by coursera. It is available on theAssignments page.

    > submit e-mail@university.org suBmISsioNPasSwoRd
    [info] Packaging /Users/luc/example/target/scala-2.11/progfun-example_2.11-1.0.0-sources.jar ...
    [info] Done packaging.
    [info] Compiling 1 Scala source to /Users/luc/example/target/scala-2.11/classes...
    [info] Connecting to coursera. Obtaining challenge...
    [info] Computing challenge response...
    [info] Submitting solution...
    [success] Your code was successfully submitted: Your submission has been accepted and will be graded shortly.
    [success] Total time: 6 s, completed Aug 10, 2012 10:35:53 PM
    >


    Eclipse Tutorial

    We recommend using the Scala IDE for Eclipse to work on the programming assignments for this course. You are of course free to use any text editor or IDE - however we are not able to provide tutorials or support for other tools.

    The Tools Setup page explains how to install the Scala IDE for eclipse.

    Creating the Eclipse project from sbt

    First, you need to create the Eclipse from sbt, using the eclipse command:

    $ sbt
    > eclipse
    ...

    Opening the Project in Eclipse

    Once the Eclipse project has been created from sbt, you can import it in Eclipse. Follow these steps to work on the project using the Scala IDE:

    1. Start up Eclipse
    2. Select "File" - "Import" from the menu
    3. In the folder "General", select the item "Existing Projects into Workspace" and click "Next >"
    4. In the textfield "Select root directory:" select the directory where you unpacked the downloaded handout archive
    5. Click "Finish".

    Working with Eclipse

    To learn how to use the Scala IDE, we recommend you to watch the official tutorial video which is available here: http://scala-ide.org/docs/current-user-doc/gettingstarted/index.html.

    This website also contains a lot more useful information and handy tricks that make working with eclipse more efficient.

    Running Tests inside Eclipse

    You can easily execute the test suites directly inside eclipse. Simply navigate to source file of the test suite in src/test/scala, right-click on it and select "Run As" - "JUnit Test".

    The JUnit window will display the result of each individual test.


    반응형
    블로그 이미지

    조이풀 라이프

    Lift is short, enjoy the life

    ,